|
PREPARATION:
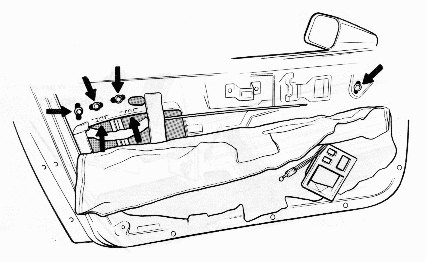
Remove door trim panel & place in a protective area.
Pull back upper portion of plastic water shield using care not to damage
it.
Determine which glass adjustments are necessary. Close door with
the glass in the full up position. Check for gaps at the weatherseals.
Operate the glass up and down again checking for gaps at the weatherseals.
Open & close the door rechecking for gaps at the weatherseals.
note:Make sure the opposite door glass is closed to ensure proper
interior compression.
Mark around all adjustment nuts with a permanent marker, this will
allow you to go back to the original adjustment if adjustment made
fails to work.
ADJUSTMENTS:
Front & rear upstops:
Use these adjustments to move the door glass higher or lower.
caution: moving the door glass up too high could cause weatherseal
seperation at the "A" & "B" pillar butt joints. Also high door glass
will force down the door prior to it reaching the striker causing the
door to drop. The result could be high door hinge wear. Door glass too
low could cause gaps at the siderail weatherseal.
To adjust, loosen the 10mm bolt on either stop and from inside the
vehicle raise the doro glass up until the glass compresses with the
weatherseal at the upper rail leaving no gaps along the entire length.
Tighten the bolts and operate the door glass up & door checking the
sealing quality. Open & close the door with the glass in the full up
position. Recheck sealing quality. Readjust until desired sealing is
achieved.
Tilt adjustment:
Use this adjustment to move the glass inboard or outboard at the
weatherseals. Use caution in making this adjustment. Too much
inboard adjustment could cause the door glass to roll up on the
inside of the weatherseals possibly causing damage to parts of the
seal. Also it may cause the weatherseal to seperate at the "A"
or "B" pillar butt joints. Too much outboard tilt could leave
gaps between the door glass and the weatherseal along the "A" or
"B" pillar. To adjust, loosen the two 10mm bolts at the glass
stabilizer. Move the door glass in or out by holding the top edge
of the glass with the glass in the full position. Tighten the
bolts and check the door glass to the weatherseal by operating
the glass up & down with the door closed. Also open & close the
door with the door glass in the full up position. Readjust the door
glass until the proper sealing position is reached.
Fore & aft:
Use this adjustment to move the door glass forward and rearward.
Use caution in making this adjustment. Too far forward could cause
the glass to hit the "A" pillar too soon. This would not allow the
door glass to reach the full up position with the door closed.
This could cause a higher door closing effort too far back could
cause wind noise or water leaks at the "A" pillar or cause the
glass to hit the quarter window. To adjust, loosen the two 10mm
bolts at the upper center pole. Move the door glass forward or rearward.
Tighten the bolts and check the door glass to the weatherseals by
operating the glass up and down and closing the door with the
glass in the full up position. Readjust until the proper sealing
position is achieved.
COMPLETION:
Check all bolts to insure proper tightness.
Refit the plastic watershield.
Reinstall the door trim panel.
Recheck the door glass sealing qualities against the weatherseal
by operating the glass up and down and opening and closing the
the door with the glass in the full up position. Making sure the
opposite door glass is close and in the full up position, ensuring
proper compression. If it is not, it may change adjustments.
|